
Started from last year when I first concerned about bean sprout hygiene on the market, I googled around to learn and tried growing them myself. Actually, food in Canada is pretty safe comparing with my home country. However, bean sprout is very easily contaminated and I usually have to buy it from Chinese stores which is I don't really love to do so. Plus, I also want to spout the beans and enjoy seeing them growing everyday myself.
 |
| How joyful is it when you can make this yourself? |
Before, whenever needing bean sprouts, I had to buy and make sure to use them in a couple of days, or else they could be spoiled very fast. In addition to that, it's not comfy to go for groceries too often, especially with a small family like mine. It thus was too hard to cook some special dishes with bean sprouts somehow (e.g: sour soup, stirred bean sprouts and beef). Now it's different, I can control how much I want and grow the beans whenever I need. And the result is also amazing, I have made bean sprouts at home many times so far. It turns out that bean sprouting maybe is the easiest "kitchen gardening" I've been done. As long as you have 10 minutes a day during 4 or 5 days, you can get it done.
What do I need to sprout beans? Very simple
- A colander (works better with flat colander than the deep one)
- A bowl fitting well with the colander
- A cover for the bowl (you can use anything else if a cover is not available)
(You usually can find a set of 3 items at any department stores or even dollar stores) - Two clean or new cotton towels (sterilized in hot water for 5 to 10 minutes before using)
- Mung beans (I just use around 1/3 to 2/3 cup of mung beans, you can use more or less depending on the need or the size of your tools above)
- Clean room temperature water
Step 1 (day 1): In the bowl, soak mung beans overnight. After a night, you will see bean skins are cracking like these.
+copy+-+after+soaking.jpg) |
| (Remember to remove all dark beans and the ones floated on water surface.) |
Step 2 (day 2):
- Run one towel under tap water (or clean water if your tap water quality is not good) and spread it evenly at the colander bottom.
- Spread mung beans on the top of the towel.
- Soak another towel with water and cover on the top of the colander. Make sure the 2nd towel will cover all spots and not letting sunlight getting on the beans. However, don't push too much force on the 2nd towel either. The beans need room to grow higher, so you can estimate to make sure there is around at least 10cm space of height between the colander bottom (or first towel) to the peak of the 2nd towel (when you pull it up). Make sure the space is the same at all sides of the colander to help the beans growing evenly too.
- Now just put the colander on the top of the bowl.
+copy+-+towel.jpg)
- Fill water directly on the top of the beans and let it run down to the bowl. The water must cover the colander bottom or reach a half height of the colander.
- Put the cover on top of the whole thing gently to prevent direct sunlight.(In the picture, colander bottom is around "houseworm" signature. Thus, the water level must be around the signature or higher. If water isn't enough or sunlight gets in, the beans will be very dark and tough later.)
+copy+-+cover.jpg)
Step 3 (day 3): Change water every day in the morning. When you change the water, remember to fill water on the beans too (through the top towel). DO NOT lift up the 2nd towel in any case. I know you want to see what is happening inside, but it's not a good idea in this case. The beans may grow unevenly, darkly or hard if you open the 2nd towel (the spots contacting with sunlight can grow faster or more slowly than the rest too).
Step 4 (day 4): You can see the bean sprouts pushing the 2nd towel up every day. You can help by adjusting the 2nd towel top and give more room for them.
After 4 days (from day 5), you can open the 2nd towel and look inside. Bean spout should be ready to harvest.
 |
| (Sprouts look like this picture or a little shorter when you first open the 2nd towel on top ) |
Step 5: Now you can remove floating bean skins or not depending on your taste. It takes time to remove the skins though. Basically you've finished growing bean sprouts. Yay! 

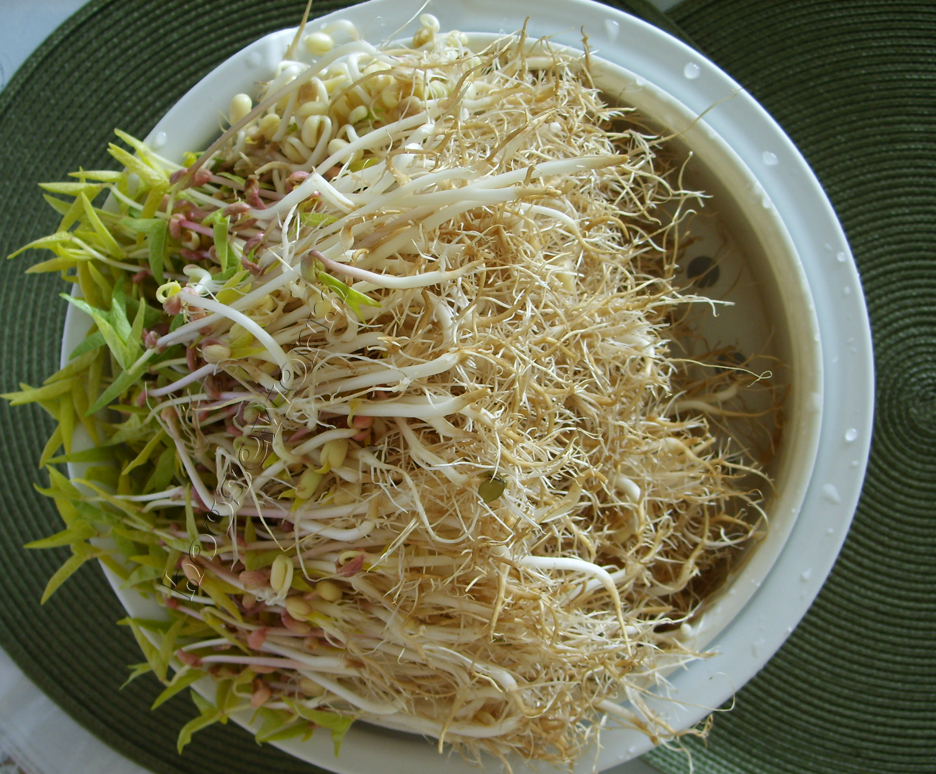
Here is the close-up shot, looks not bad, right?
 |
| (These bean sprouts are actually too high. They're good for cooking. If you eat raw sprouts, you may want to harvest at the 4th day. This one was harvested at the 5th day.) |
These are the top-down shots. Actually the sprouts are too high in these pics. All the leaves show up completely even though I was late to harvest just one day.


This is the biggest gift on my kitchen counter today.
 |
| (Do you see the dark stems? That was because I opened the 2nd towel during the time. Well, the weather at my place was switching dramatically between cold and hot during the week. I had to open and observe manually, just an exception.) |
After removing all bean skins, here come clean roots.

Ready for PHO or BANH CUON or whatever dishes you want now.
I usually split the sprouts into small bundles and keep them in ziploc bags to use gradually. Just remember to pull air out of the bags. The sprouts can last up to two weeks in veggies draws in fridge.
 |
| (Sprouts are pretty dark and tough in this picture because I harvested them late. If you harvest around 4 days totally, stems should be white and fat, not long and dark like these.) |
The towels, if you want to throw away, that's your choice. However, if you are frugal like me, you may want to re-use them. If you do, just remember to sterilize them well after you finish harvesting. Put them away in a clean bag (e.g: ziploc bag) after they dry out to make sure they're completely clean and ready for the next use. Hand washing the towels is the best choice. The towels are going to be darkened a bit after long time using (you can tell by looking at the 5th and 6th pics of step 4). Personally, I find that the color won't tell anything here. They're still good to re-use, no problem at all as long as you ensure they're clean.
You don't need to do exactly whatever I'm writing here either. Sprouting beans is very easy and flexible. You will get experience right after the 1st time. If your sprouts look better than mine, congratulations! If not, don't worry. The sprouts are still good to eat and you'll know what you need to change next time.
Finally, do you think these bean sprouts should be in a tea cup because they're too tall and too tough? Well, I think they can :]. At least they can replace a vase of flowers a couple of days to me, LOL. I hope yours won't turn out like these. Anyway, they're still good for my sour soup.

Well, I've not had to buy bean sprouts for a year, how about you?
What a lovely blog you have here! I used to make bean sprouts in my college days, but haven't for years. You have inspired me to try again!
ReplyDeleteoh, what a big surprise Donna. Thanks a lot for dropping by my blog and going through this post. I'm happy to inspire you for another crop though ;). I believe that you have a lot of experiences to share too. Will wait to see more on your blog. I also love your blog so much that I recommended it to my facebook friends and also subscribed RSS to follow daily.
Delete